How to Repair Scratches in Hardwood Floors: Complete Guide by Severity Level
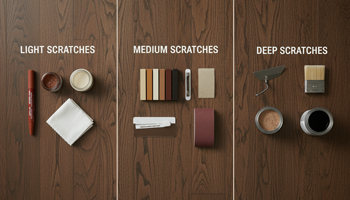
If you’re staring at scratches on your hardwood floors, breathe. Most marks can be minimized dramatically without a full refinish. My rule of thumb after 15+ years in the field: the goal is to make the damage 70–90% less visible, not “invisible.” Managing expectations prevents 80% of the disappointment I see with DIY fixes.
Quick flowchart to choose the right fix
Measure depth  →  Select method  →  Follow steps
     │                │                   │
Fingernail/Light/Water tests     Level 1 / Level 2 / Level 3
Assessing Scratch Severity: The 3-Level System
Level 1 — Surface Scratches (Finish Only)
These are scuffs in the topcoat (poly/oil/wax) that don’t catch a fingernail and don’t absorb a water droplet. They reflect light but don’t shadow the grain. Great candidates for markers, wax sticks, or a simple blend-and-buff.
Level 2 — Deep Scratches (Into Wood)
Your fingernail catches, and a tiny drop of water absorbs fast. You’ll need color-matched filler, stain blending, and a spot topcoat. Expect a good camouflage, not perfection—especially on open-grain species like oak.
Level 3 — Gouges (Structural Damage)
Visible troughs, missing fibers, or dents deeper than ⅛ inch. In solid hardwood, anything past that depth often looks best with board replacement. In engineered floors, even “small” gouges can be no-go’s for spot repair due to thin veneer.
How to Measure Scratch Depth
- Fingernail test: Run your nail perpendicular to the scratch. No catch = Level 1. Catch = Level 2–3.
- Light test: Angle a flashlight across the floor. Surface scratches reflect; deeper cuts cast a shadow.
- Water test: A tiny droplet on the mark. If it darkens fast, you’re through the finish (Level 2+).
Pro note: Color matching is an art. I carry 40+ markers and rarely use just one—blending 2–3 tones mimics natural grain variation, crucial on oak.
Level 1: Surface Scratch Repairs (DIY-Friendly)
Wood Floor Markers and Blending Pencils
- Clean area (dust + mild wood floor cleaner).
- Tap two complementary tones into the scratch following the grain; feather out.
- Buff lightly with a soft cloth; if needed, add a thin wipe of water-based poly to lock it.
Why it works: You’re tinting the finish, not the wood.
Wax Sticks and Crayons Technique
- Choose a stick slightly lighter than the surrounding tone; you can darken later.
- Warm it in your fingers; press and level with a plastic card.
- Buff; add a topcoat only if the product label allows it.
Vinegar and Olive Oil Method (For Light Scuffs)
Mix 1:3 vinegar to olive oil, dab, and buff dry. It can even out sheen on tiny scuffs.
Caution: This is a sheen trick, not a repair. Test first to avoid slippery spots.
Commercial Scratch Removers (Rejuvenate, Weiman)
Follow the label. These are blend-and-sheen products that reduce light contrast on micro-scuffs. Great for quick wins on rentals or listings.
Walnut “Meat” Trick (Natural Solution)
Reality check from my field tests: the effect is mostly from oils darkening the surface temporarily. It fades in 2–3 weeks—handy for a photo, not a long-term fix.
Success Rate: 90%+ for Fresh Surface Scratches
If the mark is new and strictly in the finish, you’ll usually hit 90% improvement with careful blending and buffing.
Level 2: Deep Scratch Repairs (Moderate Skill)
Wood Filler Selection (Color Matching Critical)
Pick a stainable filler for raw wood areas and pre-tinted putty for hairline edges. Go slightly light; it’s easier to darken with stain.
Application with Plastic Putty Knife
Push filler with the grain; overfill slightly. Clean the perimeter with a damp cloth before it cures.
Sanding Flush Technique (220-Grit)
After it sets, sand level only over the repair using 220-grit on a cork block. Do not dish out the surrounding floor.
Stain Matching and Application
Layer two or more compatible stains/markers to replicate grain contrast. I prefer alcohol-based, ultra-penetrating markers for stubborn tones—the color holds longer and bites deeper than water-based pens.
Polyurethane Spot Application
- Use a small artist brush or foam brush.
- Two thin coats > one thick coat.
- Feather your edges into the surrounding finish to avoid shiny halos.
Blending with Surrounding Floor
Rub out any gloss mismatch with a white non-abrasive pad after curing. If sheen still pops, lightly powder with a brown craft paper bag (an old finisher’s hack).
Level 3: Gouge Repairs (Advanced/Professional)
When Replacement is Better Than Repair
Gouges deeper than ⅛ inch in solid hardwood often look best after board replacement. Expect invisibility only if you match species, grade, cut, stain, and sheen. For engineered floors with thin veneers, replacement is frequently the only way.
Wood Epoxy Filler for Deep Gouges
Use a 2-part wood epoxy when replacement isn’t feasible. Shape while green; sand flush and tone with stains/markers. It fills the void but won’t recreate grain—expect “camouflaged,” not invisible.
Router and Dutchman Patch Method
For traditional floors, inlay a grain-matched Dutchman patch. This is a skilled craft—worth it on historic planks or when you want strength plus visual harmony.
Board Replacement and Weaving
Remove the damaged plank, undercut tongues, and weave in new boards to break up seams. Align growth rings and micro-bevels; then color match and topcoat.
Professional Refinishing Cost vs DIY
Spot repairs are cheaper, but extensive patterns can force a screen-and-recoat or a full sand-and-finish. Pricing varies by region and square footage; weigh the total scope, not just the worst scratch.
Repair Methods by Finish Type
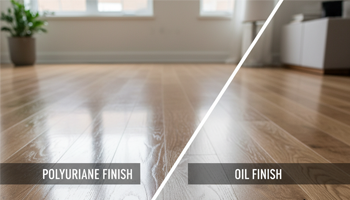
Polyurethane Finishes (Most Forgiving)
Water-based poly spot fixes cure fast and yellow less; oil-based blends warm tones better. Always feather edges and keep coats thin.
Oil-Finished Floors (Easiest Spot Repairs)
Rub-in oils and hardwax oils are reparable locally. Clean, abrade lightly (maroon pad), apply oil, and buff to sheen.
Waxed Floors (Re-Wax After Repair)
Use compatible paste wax after your color work. Buff well; avoid mixing waxes with polys unless the manufacturer explicitly allows it.
Pre-Finished vs Site-Finished Challenges
Pre-finished boards have micro-bevels and factory UV cures; blending sheen and bevel lines is tricky. Site-finished floors are generally easier to blend.
Pet Scratch Specific Solutions
Dog Nail Scratches (Most Common Pattern)
Diffuse, linear trails near entries. Prioritize marker + wax stick for visible runs; finish with a maintenance coat if many lanes appear.
Cat Claw Damage (Deeper, Focused)
Pounced spots near thresholds and stairs. Expect Level 2 tactics—filler + touch-up stain + spot poly.
Preventive Measures (Nail Trimming, Paw Pads)
Keep nails trimmed; consider paw pad grips. Place runners along sprint lanes and felt pads under furniture.
High-Traffic Pattern Repairs
If you’re seeing 50+ pet scratches in a room, spot repairs look patchy. My honest line to clients: fix the worst 5–10 to improve overall look now; plan a screen-and-recoat (or full refinish) for truly uniform results.
Tools and Materials Checklist
Basic DIY Scratch Repair Kit ($25–50)
- Wood markers (two complementary tones)
- Wax stick + plastic leveler card
- 220-grit paper + cork block
- Mild cleaner + microfiber cloths
- Small artist brush for spot poly
Professional-Grade Tools ($100–200)
- Alcohol-based ultra-penetrating stain markers
- Stainable filler + 2-part epoxy for gouges
- Random orbit sander (⅛-sheet detail sander for edges)
- White and maroon pads for rubout
Where to Source Color-Matched Products
Big box stores carry basics; specialty finishers’ suppliers stock pro-grade markers and stains and better filler color ranges for oak, maple, and hickory.
Common Mistakes to Avoid
Using Wrong Color Wood Filler (Too Dark/Light)
Go slightly light and glaze darker; dark filler in a light grain screams “patch.”
Over-Sanding and Creating Dips
Keep sanding localized and flat. Use a block; stay off bare wood you don’t intend to refinish.
Applying Too Much Polyurethane (Shiny Spots)
Thick coats create halos. Two or three ultra-thin coats blend far better.
Not Testing Products in Hidden Areas
Always test on a closet/behind a door for color and sheen before you touch the center of the room.
When to Call a Professional
Extensive Damage (Multiple Boards)
When scratches form patterns across traffic lanes, consider a screen-and-recoat or refinish for uniformity.
Irreparable Scratches (Full Refinish Needed)
If you’ve cut through stain in many spots or have dark water intrusion, spot fixes won’t unify the look.
Matching Existing Finish (Color/Sheen Issues)
Complex colors (gray washes, reactive stains) and high-gloss sheens demand pro blending to avoid halos.
Cost Analysis: DIY vs Professional
DIY is great for isolated scratches. If you’re touching up every few inches, labor time + materials often equals the cost of a pro maintenance coat.
Prevention Strategies Post-Repair
Furniture Pads (Felt vs Rubber)
Use felt pads on wood. Avoid rubber on finished hardwood—it can leach or stick.
Area Rugs in High-Traffic Zones
Anchor runners at entries, hallways, and under dining chairs. Use rug pads rated for hardwood finishes.
No-Shoes Policy Implementation
A simple rack and message at the door cuts grit and micro-scratches dramatically.
Regular Maintenance Schedule
Vacuum with a soft floor head, damp-mop (cleaner approved by your finish), and plan a screen-and-recoat every few years in busy homes.
Spot repair and blending belong to the Hardwood Floor Care strategy, and sheen uniformity is maintained using Best Hardwood Floor Cleaner.
FAQs
How to repair deep scratches in hardwood floors without refinishing?
Use a stainable filler, sand flush (220-grit), blend with two-tone markers/stain, and spot-coat with water-based poly. It won’t be perfect, but it’s the best non-refinish path.
Can surface scratches be buffed out of hardwood?
Often yes. Clean, blend with a marker or scratch remover, then buff. For stubborn sheen mismatch, a maintenance coat can unify gloss.
Best wood filler color match for oak floors?
Start one shade lighter than the field color, then glaze darker with markers to echo oak’s light-dark grain contrast.
DIY hardwood floor gouge repair vs professional cost?
DIY epoxy + stain + spot coat = inexpensive materials but visible camo. A pro board replacement (and blending) costs more but can be near-invisible when done right.
Pet scratch repair hardwood floors Home Depot products—what actually works?
Combo of markers + wax stick for quick cosmetics. For broad pet patterns, a screen-and-recoat beats dozens of spot patches.
Currently viewing
Repair Scratches in Hardwood Floors

Refinishing Hardwood Floors
Sand & Refinish vs Screen & Recoat — Complete Comparison Guide If you’re weighing screen…
Polyurethane vs Oil Finish Floors
Durability & Maintenance Comparison If you’re comparing polyurethane vs oil finish for hardwood floors, you’re…
Best Hardwood Floor Cleaner
pH-Neutral & No-Residue Options TL;DR (buyer’s snapshot): For most homes, a pH-neutral hardwood floor cleaner…
Hardwood Floor Care Masterclass
Complete Guide by Wood Species & Finish If you want hardwood floor care by species…


